Senin, 03 Oktober 2016

Supaya Foto WhatsApp tidak tersimpan otomatis

Agar Foto WhatsApp tidak otomatis tersimpan.
Foto WhatsApp agar jangan langsung download otomatis.
Agar Foto-foto atau gambar yang diterima lewat Whatsapp tidak tersimpan secara otomatis, karena foto-foto tersebut belum tentu kita perlukan, dan tentunya akan memakan tempat /ruang memory, apalagi kalau anda misalnya bergabung dalam beberapa grup, memory akan cepat dipenuhi oleh foto-foto atau gambar yang belum tentu anda sukai atau anda butuhkan, maka sebaiknya setting download/unduhnya tidak dibuat otomatis.

Secara default foto-foto atau gambar yang diterima di Aplikasi WhatsApp akan langsung didownload dan tersimpan di memory.
Untuk Video, audio dan Dokumen lain, bawaan setting WhatsAppnya tidak didownload secara otomatis, tetapi siapa tahu di Smartphone anda sudah diset otomatis download, jadi perlu diperhatikan juga.


Untuk membuat agar download foto/gambar, audio dan video di WhatsApp tidak otomatis. di WhatsApp for Android

1. Tap/sentuh pada Menu (ikon titik 3 vertikal).


Read more

Minggu, 02 Oktober 2016

Skedul Shutdown Windows 10

Cara membuat skedul Shutdown di Windows 10

Untuk membuat komputer Windows shutdown pada waktu tertentu sesuai dengan waktu yang kita inginkan salah satunya adalah dengan perintah di command line/command prompt atau melalui Run command dialog.

Perintahnya adalah shutdown -s -t WaktuDalamDetik

Contoh untuk mematikan komputer dalam 10 menit ke depan maka perintahnya adalah:
shutdown -s -t 600

Untuk membuka Run command, tekan tombol Windows+R
Ketikkan perintah shutdown tadi dalam kolom Run. Kemudian tekan Enter atau klik OK.


Read more

Sabtu, 01 Oktober 2016

Awarded as Microsoft MVP for the second time - October 2016

Today I am very happy to announce that, I have been awarded as Microsoft MVP (Most Valuable Professional) for the second consecutive year in a row and I am still a Windows Development MVP since October 2015.

Thanks a lot to Microsoft, Microsoft MVP Award team, Gandharv Rawat & Biplab Paul for this special recognition. A special thank to my blog readers, all my community friends for your support and feedback throughout the year. Without you, it would be quite difficult.

And here’s the prestigious mail from Microsoft MVP Award team:

Note: I will post MVP Award Kit photos here, once i received it.

Below points  for those who don’t know about the Microsoft MVP Award Programme. Here is a short snippet from the Microsoft MVP site 

What is MVP Award?
1. The MVP award recognizes individuals who, over the past 12 months, have demonstrated superior knowledge, leadership and passion, combined with a desire to help and accelerate other's learning, careers, and abilities.
2. You can nominate yourself to be considered for an MVP Award or if you know someone who is an outstanding community leader or an exceptional contributor toward Microsoft Technology, Apply Here to submit your entry. It will go thru an evaluation process and at the end the new candidate will be awarded based on his technical knowledge and contribution towards the community.

Who are MVPS?
Microsoft Most Valuable Professionals, or MVPs, are technology experts who passionately share their knowledge with the community. They are always on the "bleeding edge" and have an unstoppable urge to get their hands on new, exciting technologies. They have very deep knowledge of Microsoft products and services, while also being able to bring together diverse platforms, products and solutions, to solve real world problems. MVPs are driven by their passion, community spirit and their quest for knowledge.
You can also find my MVP award profile from Microsoft MVP site and also find my list of awards from here.

Conclusion:
I am proud to be part of this community by sharing my technical knowledge and helping developer community through my blog and various online forums. I mainly blog on Windows 10 UWP, Windows Store, Windows Phone and also sharing other section like Xamarin Cross-Platform. I will continue my work in the coming year and will try to serve the community in a better way.

Finally, my warm congratulation to all new MVPs, welcome onboard. Also my congratulation to all renewed MVPs of this quarter.


Follow me always at  
Have a nice day by  :)


Jumat, 30 September 2016

Kembali ke user lokal Windows 10

Cara kembali ke akun lokal Windows 10.


Dengan login/sign-in ke komputer Windows menggunakan akun Microsoft, tentu banyak kelebihan yang ditawarkan karena user lebih mudah terintegrasi dengan layanan dari Microsoft, seperti email, onedrive, dll.

Tapi karena alasan tertentu mungkin anda ingin kembali ke user/akun lokal.

Untuk kembali ke akun lokal di Windows 10

1. Klik pada Start menu program.
2. Pilih Settings.


3. Pada layar Settings, pilih Accounts.


4. Pada layar Accounts pilih:  Sign in with a local account instead.
Read more

Kamis, 29 September 2016

Notepad di WIndows 10

Cara Membuka Notepad di Windows 10.
Cara Membuat Shortcut Notepad di Desktop.
Pada Windows 7 dan sebelumnya, Notepad berada di Start menu katagori Accessories bersama dengan MS Paint, Wordpad dll.
Pada Windows 10 Kita tidak lagi menemukan Notepad di menu All Apps (Start menu program).
Tapi walaupun tidak dimunculkan di menu All Apps sebenarnya aplikasinya masih ada. Kita bisa langsung panggil menggunakan Run command atau kita bisa kita buat shortcutnya untuk ditampilkan di desktop atau dipin di taskbar.


Untuk menjalankan Notepad melalui Run Command:

1. Tekan tombol logo Windows + R. maka akan muncul RUN dialog.
2. Pada kolom RUN Ketikkan Notepad kemudiatekan Enter atau klik OK.


Maka Notepad akan muncul.


Untuk membuat shortcut Notepad di Desktop :

Read more

Rabu, 28 September 2016

Cara setting Proxy di Microsoft Edge

Bagaimana cara setting Proxy di browser Microsoft Edge.
Browser Microsoft  di Windows 10 bukan lagi Internet Explorer, tetapi namanya adalah Microsoft Edge.
Pada layanan network tertentu atau aplikasi tertentu yang mengharuskan setting Proxy server, untuk browser Microsoft Edge saat ini sudah tidak tersedia menu langsung menuju untuk menuju ke proxy setting.(berbeda dengan Internet Explorer yang ada menu Internet Options untuk menuju ke proxy setting).
 
Tetapi sebenarnya bukan masalah karena walaupun tidak ada menu Internet Options untuk menuju ke Proxy setting di browser Microsoft Edge, kita masih dengan mudah untuk dapat masuk ke Internet Options menggunakan cara lain.

1. Tekan tombol Windows + R untuk membuka Run dialog.
2. Kemudian ketikkan inetcpl.cpl klik OK atau tekan Enter.


Read more

Cara Reset Browser Mozilla Firefox

Set Mozilla Firefox ke kondisi awal.

Istilah mereset browser ke kondisi awal di browser Mozilla Firefox adalah Refresh Firefox. 

Cara Refresh Firefox :

1. Masuk ke Troubleshooting Information. 

Untuk masuk ke Troubleshooting Information ada beberapa cara :

•  Masuk ke tab menu Help kemudian pilih Troubleshooting Information.


•  Atau melalui Icon menu yangada di sudut kanan, kemudian pilih icon ' '(help).


Kemudian pilih Troubleshooting Information.


• Atau cara lainnya yaitu dengan menuliskan about:support di address bar.


Read more

Selasa, 20 September 2016

Cara reset browser Chrome

Cara mereset setting Browser Google Chrome.
Reset suatu browser  diperlukan  apabila  setingannya sudah diluar yang kita kehendaki misalnya startup page atau new tabnya adalah halaman yang bukan keinginan kita,  extensions yang ada banyak yang  tidak kita kenal, search engine bukan yang biasa (suka muncul selain Google,Yahoo,Bing) dll. Hal-hal tersebut biasanya disebabkan oleh download atau instal free software yang diikuti oleh software lain atau adware yang tidak kita kehendaki..

Untuk mengatasinya dari pada satu persatu kita setting atau perbaiki mendingan sekaligus yaitu dengan cara meReset browser, sehingga setting browser kembali ke kondisi awal (default).

Untuk browser Google Chrome cara untuk resetnya adalah:

1. Klik pada logo menu (titik tiga vertikal di sebelah kanan atas), kemudian pilih Settings.


Atau cara lain untuk menuju Setting di Google chrome adalah dengan mengetikkan chrome://settings di address bar.


2. Setekah berada di jendela Settings, klik pada Show advanced settings, lokasinya ada di paling bawah dari halaman settings.


3. Kemudian setelah halaman Advanced settings terbuka, kita lihat lagi ke halaman paling bawah, disana ada tombol Reset settings, klik pada tombol Reset settings tersebut.


4. Akan muncul jendela yang menerangkan tentang Reset settings Google Chrome.
Klik pada Reset untuk memulai proses reset.


Minggu, 18 September 2016

Cara Reset browser Microsoft Edge

Cara mereset browser Microsoft Edge.

Microsoft Edge adalah browser Microsoft di Windows 10  yang kalau di Windows-Windows sebelumnya bernama Internet Explorer.
Tampilan dan menunya agak berbeda dengan Internet Explorer tapi tetap tidak meninggalkan ke-khasannya atau cirinya sebagai browser keluaran Microsoft.

Untuk mereset browser Microfoft Edge :

Berbeda dengan Internet Explorer, dari Browser Microsoft Edge tidak ada menu untuk  menuju ke Internet options. (Jadi caranya tidak melalui browser).

1. Tekan logo Windows + R (untuk menampilkan RUN dialog).
2. Kemudian ketikkan  inetcpl.cpl  , klik OK atau tekan Enter.
Read more

Kamis, 15 September 2016

Cara Mengambil Musik dari Video

Cara capture audio/music dari Youtube.
Cara mengambil suara dari Video.

Cara capture atau mengambil musik/audio dari suatu Video baik itu video yang berada di komputer (offline) atau video online dari situs streaming video atau dari situs berbagi video.

Cara mudah dan hasilnya bagus (kualitasnya bagus) yaitu dapat menggunakan software atau aplikasi bernama  Audacity, yaitu software untuk audio/music editing.
untuk download silakan buka di http://www.audacityteam.org/

• Setelah didownload dan diinstal, jalankan aplikasinya.

• Karena tujuannya merekam/mengambil audio dari suatu video, untuk komputer yang ada microphonenya (laptop umumnya ada microphonenya) maka sebaiknya microphonenya tersebut didisable supaya suara-suara di sekitar  tidak masuk/tidak ikut terekam.
Untuk mendisable microphone Pada tray icon klik kanan pada logo/ikon speaker.
Kemudian pilih/klik  Recording devices.

• Klik kanan pada Microphone, kemudian pilih Disable. klik Apply, klik OK.

Disable Microphone di Windows 10

• Jalankan aplikasi Audacity.
• Buka dan Jalankan Video yang akan diambil audionya. (Video dari internet atau dari lokal Harddisk/DVD).
Read more

Rabu, 14 September 2016

Cara mengetahui IP address Windows 10

Untuk mengetahui IP address/alamat IP (Internet Protocol address) di Windows 10, sama halnya seperti pada Windows-Windows sebelumnya, yaitu bisa melalui command line/Command prompt, atau melalui menu Network and Sharing Center.

Cara mengetahui IP Address melalui Command line :
1. Tekan tombol Logo Windows + R (untuk membuka RUN command)
2. Tulis cmd, kemudian klik OK atau tekan Enter.


2. Jendela Command line akan terbuka, Ketik ipconfig kemudian tekan enter, maka IP address akan ditampilkan

Cara mengetahui IP address melalui Command line. IP 4 address ditampilkan pada yang dilingkari merah


Cara mengetahui IP Address melalui  Network and Sharing Center:
Read more

Jumat, 09 September 2016

Cara Mengetahui Tegangan dan Arus Port USB

Ketika proses charging(pengisian)  HP, Smartphone, komputer tablet, power bank, dll, prosesnya untuk sampai penuh ada yang memerlukan waktu lama, sedang, dan ada juga yang sebentar.
Cepat atau lambatnya proses pengisian tersebut  tergantung dari 2 hal yaitu :
- Besar kecilnya arus yang mengalir dari charger atau sumber tegangan ke perangkat yang diisinya.
- Kemudian yang kedua yaitu  tergantung dari kapasitas baterai smartphone, Hp, dll yang diisinya, semakin besar mAHnya maka akan semakin lama proses pengisiannya untuk sampai penuh.

Kalau anda penasaran atau sekedar ingin tahu atau mungkin punya sedikit masalah merasa ada yang aneh dengan proses pengisian perangkat yang anda miliki yang menggunakan port USB (tegangan 5 Volt DC), dari USB charger atau dari USB laptop/komputer. Anda dapat menggunakan alat ukur yang praktis yaitu mini USB tester.

Mini USB tester
Mini USB tester yaitu alat untuk mengetahui Tegangan (Vokt DC) dan arus (Amphere) dari suatu  port USB.

Bagi anda yang belum tahu cara instalasi dan cara kerjanya, sederhana saja, tidak mungkin salah colok,dapat dilihat pada gambar di bawah  berikut.

Model mini USB tester seperti yang saya gunakan ini, untuk displaynya akan bergantian secara otomatis antara tegangan(Volt) dan arus (Amphere).selang beberapa detik.  

Pada contoh berikut tegangan dari charger terbaca 5,03V

Display mini USB tester  sedang menunjukkan tegangan dari Charger
Arus yang mengalir dari charger ke smartphone terbaca 1,05A
Display mini USB tester sedang menunjukkan Arus dari Charger ke smartphone
Read more

Rabu, 07 September 2016

Cara koneksi Bluetooth Audio Receiver

Kalau anda mempunyai perangkat audio Amplifier, speaker aktif, atau apalah istilahnya yang belum dilengkapi dengan bluetooth receiver, tentu kalau ingin menjalankan lagu/musik dari smartphone, tablet komputer dll supaya terhubung ke speaker aktif/audio amplifier tersebut maka koneksinya harus menggunakan kabel.

Tapi sekarang sudah banyak dijual bluetooth audio receiver yang bentuknya seperti Flashdisk dan harganya relatif murah, dapat dijadikan solusi untuk perangkat audio amplifier atau speaker aktif yang belum memiliki Bluetooth. sehingga anda tidak memerlukan kabel lagi yang dihubungkan dari smartphone ke speaker aktif untuk mendengarkan musik dari smartphone/tablet.

Bluetooh Audio Receiver
Cara menyambungkan Audio Bluetooth receiver diperlihatkan pada gambar berikut :


Untuk supply listriknya Bluetooth jenis ini bisa dicolok ke adaptor charger HP/smartphone yang ada soket USBnya (5V DC).
Read more

Senin, 05 September 2016

Cara transfer domain dari godaddy

Cara transfer atau memindahkan domain dari suatu registrar domain (pengelola domain) ke registrar domain lainnya caranya tidaklah sulit, cukup meminta EPP code ( EPP code adalah kode otorisasi domain sebagai kode keamanan) dari registrar domain awal, untuk di entrikan di registrar domain yang baru.

Contoh domain saya dengan nama bagaimanacara.info di Godaddy.com akan dipindahkan ke Rumahweb.com, alasan pemindahan mungkin berbeda-beda bagi setiap orang, kalau saya alasannya karena nama domainnya berbahasa indonesia dan target usernya adalah di indonesia, jadi mau memindahkan ke registrar domain yang ada di Indonesia. Kemudian alasan lainnya adalah harganya disini lebih murah :).

Langkah-langkah untuk transfer Domain :
Pada contoh yang dipakai adalah transfer dari GoDaddy ke Rumahweb.

1. Login ke Godaddy, kemudian pilih domain yang akan dipindahkan/ditransfer.


2. Masuk ke Setting Domain.
3. Edit Contact Information kalau belum update.
4. Domain Lock harus pada posisi off.
5. Kemudian pilih/klik pada Get authorization code. (ini yang dimaksud EPP code)
6. Epp code atau authorization code akan dikirim lewat email, kode tersebut diperlukan untuk dientri di Domain Registrar yang baru.

Read more

Windows 10 UWP Community Toolkit: Twitter integration sample (C#-Xaml)

Introduction:
In the previous article, I wrote an article about "How to integrate twitter in silver-light windows phone 8.0". Previously we need to integrate third party libraries with so many lines of code to post a status message on the social network. But fortunately, now it is very easy to post a status message on Twitter & Facebook social networks with windows 10 UWP Community Toolkit Services.
Note: If you are new to Windows 10 UWP app development, please read Windows 10 Beginners Guide.

Requirements:
  • This article is targeted for windows 10 Anniversary Update, so make sure you’ve downloaded and installed the latest Anniversary Windows 10 SDK from here.
  • We no longer need a developer license with Windows 10. But we must Enable Developer Mode to your device for development.
  • This post assumes you’re using Microsoft Visual Studio 2015 Update 3 or Later.
  • This article is developed on windows 10 machine.
    Note: 
    1. UWP Community Toolkit is compatible with apps developed for Windows 10 SDK Build 10586 or above.
    2. Windows 10 SDK works best on the Windows 10 operating system. And it is also supported on Windows 8.1, Windows 8, Windows 7, Windows Server 2012, Windows Server 2008 R2, but not all tools are supported on these operating systems.

    Description:
    This article can explain you about below topics
    1. How to create new project With Windows 10 Anniversary SDK?
    2. How to Add UWP Community Toolkit in Windows 10 Project?
    3. How to use UWP Community Toolkit in Windows 10?
    4. How to post the status message on Twitter in Windows 10 UWP Project?
    5. How to tweet with the picture, getting user timelines, also search for the specific tag in Windows 10 UWP Project?
    6. How to run and test Windows 10 UWP project?

    1. How to create new project With Windows 10 Anniversary SDK?
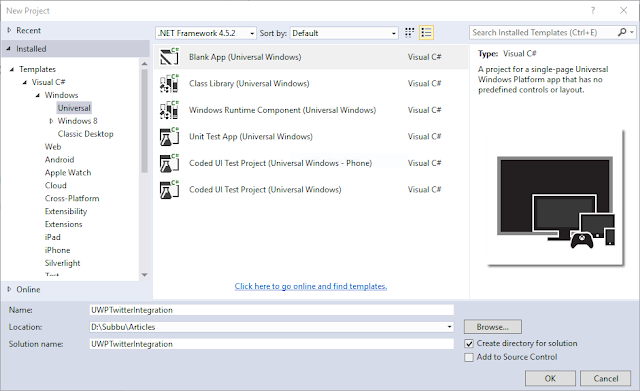
    Before to use Windows 10 UWP Community Toolkit, first we need to create the new project. 
    • Launch Visual Studio 2015 Update 3 or Later
    • On the File menu, select New > Project.
    • The New Project dialog appears. The left pane of the dialog lets you select the type of templates to display.In the left pane, expand Installed > Templates Visual C# > Windows, then pick the Universal template group. The dialog's center pane displays a list of project templates for Universal Windows Platform (UWP) apps.
    • In the center pane, select the Blank App (Universal Windows) template.The Blank App template creates a minimal UWP app that compiles and runs but contains no user interface controls or data. You add controls to the app over the course of this tutorial.In the Name text box, type "UWPTwitterIntegration".Click OK to create the project.
    For this sample, you must target the app with minimum version 10.0.10586 or later. Because UWP Community Toolkit is compatible with apps developed for Windows 10 SDK Build 10586 or above.

    2. How to Add UWP Community Toolkit in Windows 10 Project?
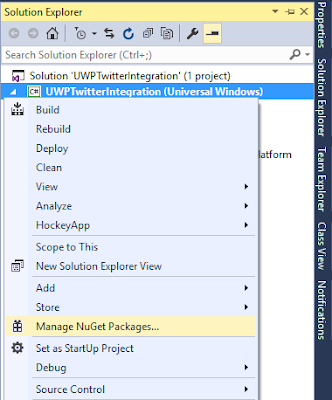
    In Solution Explorer panel, right click on your project name and select "Manage NuGet Packages".

    Search for "Microsoft.Toolkit.UWP.Services" to select desired packages and install them.
    This will add Microsoft.Toolkit.Uwp.Services.dll in 'References' of your project, as shown below:


    3. How to use UWP Community Toolkit in Windows 10?
    In this article, We are using services from UWP Community Toolkit for twitter integration. So we need to add related namespace "using Microsoft.Toolkit.Uwp.Services.Twitter" to Initialize "TwitterService" class
    4. How to post the status message on Twitter in Windows 10 UWP Project?
    We have to follow below steps to post a status message on twitter.
    Step 1:
    First of all, you have to create the twitter application Consumer id & Consumer secrets. So go to Twitter Developer Website and create new twitter app like below information.
    Step 2: After creating your Twitter App. Now you have to set the access level for your app under "Permissions" Tab. There are three options for setting level.
    Read Only: Select this permission if you want to only read the data and don’t want to post anything.
    Read & Write: Select this permission if you want to read as well as post the data.
    Read, Write & Acess direct messages: This permission will allow an application to read or delete a user's direct messages.
    Step 3: Get Consumer Key (API Key), Consumer Secret (API Secret) from "Keys and Access Tokens" Tab. Also we have to note Callback URL from "Settings" Tab.
    Step 4: Create XAML UI for user twitter login, displaying user details and also for sending the status message.
    1. <Page  
    2.     x:Class="UWPTwitterIntegration.MainPage"  
    3.     xmlns="http://schemas.microsoft.com/winfx/2006/xaml/presentation"  
    4.     xmlns:x="http://schemas.microsoft.com/winfx/2006/xaml"  
    5.     xmlns:local="using:UWPTwitterIntegration"  
    6.     xmlns:d="http://schemas.microsoft.com/expression/blend/2008"  
    7.     xmlns:mc="http://schemas.openxmlformats.org/markup-compatibility/2006"  
    8.     mc:Ignorable="d">  
    9.   
    10.     <Grid Background="White" >  
    11.         <Grid>  
    12.             <Grid.RowDefinitions>  
    13.                 <RowDefinition Height="Auto"/>  
    14.                 <RowDefinition Height="*"/>  
    15.             </Grid.RowDefinitions>  
    16.             <!--Header Titile-->  
    17.             <TextBlock Grid.Row="0" Foreground="#FF736B74" Margin="12" Text="UWP Twitter Integration" FontWeight="Bold" FontSize="25" />  
    18.               
    19.             <!--Twitter Login Button-->  
    20.             <Button Name="BtnTwitterLogin" Grid.Row="1" HorizontalAlignment="Stretch" Margin="12"  BorderThickness="0" Content="Login in Twitter" Background="#FF3FD483" Foreground="White" Click="BtnTwitterLogin_Click" />  
    21.               
    22.             <!--UI for After Twitter Login-->  
    23.             <Grid Grid.Row="1" Name="GridRoot" Visibility="Collapsed" VerticalAlignment="Center">  
    24.                 <Grid.RowDefinitions>  
    25.                     <RowDefinition Height="Auto"/>  
    26.                     <RowDefinition Height="*"/>  
    27.                 </Grid.RowDefinitions>  
    28.                   
    29.                 <!--UI for displaying User details after twitter login-->  
    30.                 <Grid Name="GridUserDetails">  
    31.                     <Grid.ColumnDefinitions>  
    32.                         <ColumnDefinition Width="100"/>  
    33.                         <ColumnDefinition Width="Auto" />  
    34.                     </Grid.ColumnDefinitions>  
    35.   
    36.                     <!--Displaying User Image profile by binding with ProfileImageUrl-->  
    37.                     <Image Name="ImgTwitterProfile" Stretch="UniformToFill" Source="{Binding ProfileImageUrl}" Grid.Column="0" Margin="12" HorizontalAlignment="Center" />  
    38.   
    39.                     <!--Displaying User profile details by binding with Name & ScreenName-->  
    40.                     <Grid Grid.Column="1">  
    41.                         <Grid.RowDefinitions>  
    42.                             <RowDefinition Height="Auto"/>  
    43.                             <RowDefinition Height="*"/>  
    44.                         </Grid.RowDefinitions>  
    45.                         <TextBlock Grid.Row="0" Foreground="Black" Margin="12" Text="{Binding Name}" FontSize="18" />  
    46.                         <TextBlock Grid.Row="1" Foreground="Black" Margin="12,5,0,0" Text="{Binding ScreenName}" FontSize="18" />  
    47.                     </Grid>  
    48.                 </Grid>  
    49.                   
    50.                 <!--UI for post status-->  
    51.                 <StackPanel Grid.Row="1" Name="StckPostMessage" Margin="0,12,0,0">  
    52.                     <TextBox Name="TbxStatus" TextWrapping="Wrap" BorderBrush="#FF23E0D8" Height="150" Margin="12" HorizontalAlignment="Stretch"   Foreground="#FF736B74" />  
    53.                     <Button Name="BtnTwitterPost" Content="Post Status" HorizontalAlignment="Stretch" Margin="12"  BorderThickness="0" Background="#FF3FD483" Foreground="White" Click="BtnTwitterPost_Click" />  
    54.                 </StackPanel>  
    55.   
    56.             </Grid>  
    57.         </Grid>  
    58.           
    59.         <!--Loader-->  
    60.         <ProgressRing x:Name="myProgressRing" IsActive="False" Height="50" Width="50" />  
    61.     </Grid>  
    62. </Page>  
    Step 5: Now it is time for twitter login, but first we have to initialize twitter service class from Community Toolkit. Please note that, here you need to pass three arguments(your twitter ConsumerKey, ConsumerSecret & CallbackUri). 
    1. // Initialize service  
    2. TwitterService.Instance.Initialize(ConsummerKey, ConsumerSecret, CallbackUri);  

    Step 6: After that write below code in login button click
    1. private void BtnTwitterLogin_Click(object sender, RoutedEventArgs e)  
    2.        {  
    3.            //Activate loader on twitter login  
    4.            myProgressRing.IsActive = true;  
    5.   
    6.            //Pass ConsumerKey, consumerSecret & CallbackUri  
    7.            TwitterLogin("YOUR CONSUMER_KEY""YOUR CONSUMER_SECRET""CALLBACK_URI");  
    8.        }  
    9.        private async void TwitterLogin(string ConsummerKey, string ConsumerSecret, string CallbackUri)  
    10.        {  
    11.            // Initialize service  
    12.            TwitterService.Instance.Initialize(ConsummerKey, ConsumerSecret, CallbackUri);  
    13.   
    14.            // Login to Twitter  
    15.            if (!await TwitterService.Instance.LoginAsync())  
    16.            {  
    17.                myProgressRing.Visibility = Visibility.Collapsed;  
    18.   
    19.                //Showing login fialure message  
    20.                MessageDialog messageDialog = new MessageDialog("Login failure!");  
    21.                await messageDialog.ShowAsync();  
    22.                return;  
    23.            }  
    24.   
    25.            myProgressRing.Visibility = Visibility.Collapsed;  
    26.            BtnTwitterLogin.Visibility = Visibility.Collapsed;  
    27.            GridRoot.Visibility = Visibility.Visible;  
    28.            // Get current user info  
    29.            var user = await TwitterService.Instance.GetUserAsync();  
    30.   
    31.            //Binding UI with user info  
    32.            GridUserDetails.DataContext = user;  
    33.        }  
    Step 7: Now we are almost done, and it is time for post status message on Twitter. So write below code on post status button click.
    1. private void BtnTwitterPost_Click(object sender, RoutedEventArgs e)  
    2.        {  
    3.            TwitterPostStatus(TbxStatus.Text);  
    4.        }  
    5.   
    6.        private async void TwitterPostStatus(string StatusMessage)  
    7.        {  
    8.            // Post a tweet  
    9.            await TwitterService.Instance.TweetStatusAsync(StatusMessage);  
    10.        }  
    5. How to tweet with the picture, getting user timelines, also search for the specific tag in Windows 10 UWP Project?
    It is very easy to tweet with the picture, to get user timelines and also search for the specific tag.
    1. // Get user timeline  
    2.   ListView.ItemsSource = await TwitterService.Instance.GetUserTimeLineAsync(user.ScreenName, 50);  
    3.   
    4.  // Post a tweet with a picture  
    5.   await TwitterService.Instance.TweetStatusAsync(TweetText.Text, stream);  
    6.   
    7.     // Search for a specific tag  
    8.   ListView.ItemsSource = await TwitterService.Instance.SearchAsync(TagText.Text, 50);  


    6.  How to run and test Windows 10 UWP project?
    Now its time to test our sample App, In addition to the option to Debug on a desktop device, Visual Studio provides options for deploying and debugging your app on a physical mobile device connected to the computer, or on a mobile device emulator. You can choose among emulators for devices with different memory and display configurations like below

    Note: 
    1. It's a good idea to test your app on a device with a small screen and limited memory, so use the Emulator 10.0.10586.0 WVGA 4 inch 512MB option.
    2. If you want to test our app in physical device, you must Register your Windows Phone device for development.
    3. If you already have .APPx file, you can deploy it from WinAppDeployCmd.exe tool

    After selecting emulator/device, From the Debug menu, click Start Debugging or Press F5. Then we can found below screen on emulator/device:

    Intial UI, User need to click login button for authentication.
    After that screen will redirect to twitter website, and it will ask for user twitter login and password.
    After twitter login success, UI will display user details and also there is an option to post status message.

    User needs to type his status message and need to click on "Post Status" button.
     After that status message will post on user's timeline.

    UWPTwitterSample
    FeedBack Note:
    Please share your thoughts,what you think about this post,Is this post really helpful for you?I always welcome if you drop comments on this post and it would be impressive.

    Follow me always at @Subramanyam_B
    Have a nice day by  :)